How to Inherit Odoo PoS using OWL Javascript Framework
In this tutorial, we are going to discuss how we can create a new PoS screen, a new button, a new popup screen and how we can update records from the database and retrieve those records in realtime without reloading the page.
In the previous topic, we have done inheriting a component, a model and the template of Point of Sale. For those who doesn't watched that yet, you can watch the video below.
Project Overview
Let's first discuss the project that we are going to create in this tutorial. We will be adding a new control button Favorites on the right side. I will be showing you how you can add this button in different positions and also based on conditions.
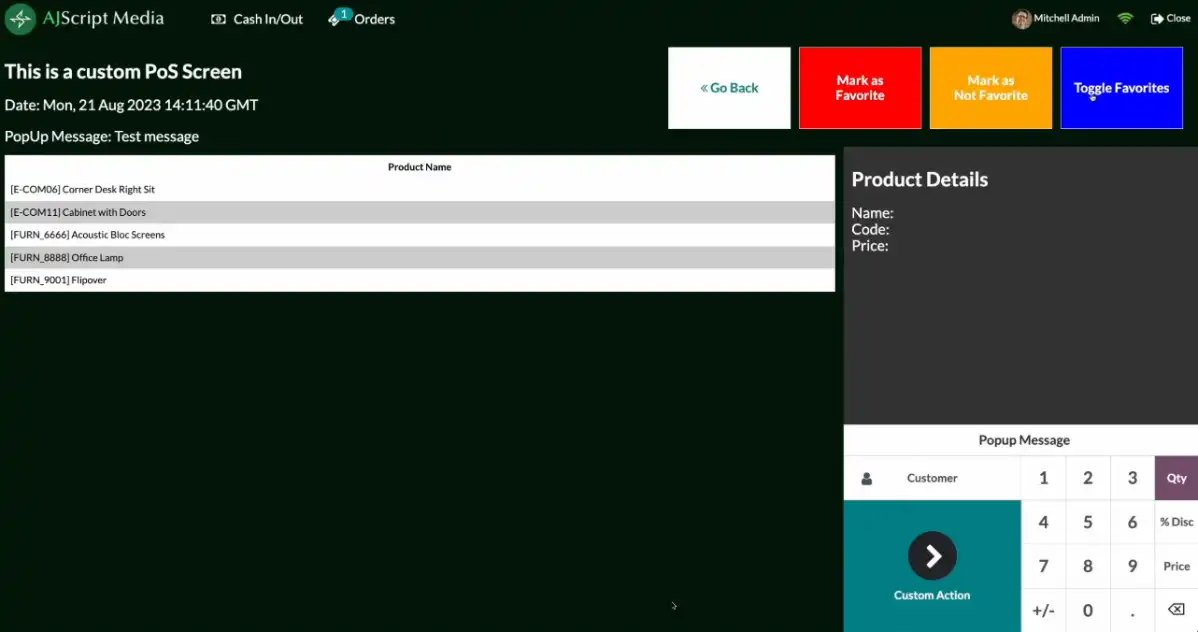
If we click Favorites Button, a new custom Screen will be rendered. In this project, I added a title, a date and a sample popup message. If we click Popup Message button, a new popup screen will show that you can drag. We can add a message and once we confirm it, it will display the message on the screen. This is just to show you how you can pass the data from popup screen to other components.
We will have the list of favorite products on the left side and all actions are added on the top right buttons. Toggle screen to switch between favorite products and all products. When clicking one product, the details will show on the right side. If we mark it as not favorite, it will be removed from favorite products. Clicking toggle favorites to get the updated list. To remove products from favorits, click Favorites Button, select the product and click mark as not Favorite.
The buttons on the bottom right corner is just to show you how you can add the default buttons of PoS.
How to Add New PoS Screen?
Basically, every PoS screen is built using a js module which will return a component. To create a new module, add odoo.define method which accepts two parameters, the first one will be the name of the js module and by default, it should be the name of the module which is point_of_sale and then the name of the component you want like FavoriteProductScreen. You can name it whatever you want.
Next parameter will be the function using require as a parameter. We need to import Registries and Component. Create a new class which will be the name of the component FavoriteProductScreen which will extend PosComponent module. Let's add a setup function and for now add a console log "New Favorite Product Screen".
Then define the template name. For better structure, the template name should be the same with the component name. Then register this component under Registries.Component. Lastly, return FavoriteProductScreen component.
new_pos_screen_name.js
js
Show or Hide Code
odoo.define('point_of_sale.FavoriteProductScreen', function (require){ 'use strict';
Now the way we can render this screen, is to add a new control button in product screen but what if we want to render it immediately? In order to do that, we can either inherit Chrome component or just temporarily edit chrome component and revert back once our testing is done.
Let's open Chrome component and under getStartScreen method, let's return FavoriteProductScreen instead of ProductScreen.
addons/point_of_sale/static/src/js/Chrome.js
js
Show or Hide Code
//...
get startScreen() {
    if (this.state.uiState !== 'READY') {
        console.warn(
            `Accessing startScreen of Chrome component before 'state.uiState' to be 'READY' is not recommended.`
        );
    }
    // return { name: 'ProductScreen' };
    return { name: 'FavoriteProductScreen' };
}
//...
Then Add a new template and name it same as the component which is FavoriteProductScreen. Add a new div and for now just add a text "This is FavoriteProductScreen".
Now we can start creating the layout. Let's add a new class to this div which we will be using for styling later. Let's type favorite-product-screen and then existing class screen so that we don't need to re-create the same styles for this element.
Let's add a new div with class screen-header, and duplicate it and change it to favorite-content, let's add new div left-pane and right-pane. Let's add some text "Left Pane, Right Pane and Screen Header". Let's check and reload the page. Okay it's working fine.
Before we create a new button, let's first discuss how to add control buttons. Basically, we can create our own button but there's specific module created for adding control buttons for each component. This module is under ControlButtonsMixin.js Open https://github.com/odoo/odoo/blob/16.0/addons/point_of_sale/static/src/js/ControlButtonsMixin.js. This module has addControlButton method that will allow each component that will inherit this module to add its own control buttons.
This method accepts an object parameter which includes a pos component, condition which is a function that returns either true or false and position by using either replace, before or after.
To create a new button, we need PosComponent, ProductScreen - since this is the screen we want to add the new button, and of course we need the Registries. We need to use the method addControlButton from controlButtonMixin which accepts and object, the first one will be the component. Then we need to add this component to the registries and return the component.
Then on the template, since we inherited ProductScren, the buttons will automatically added based on the position and conditions you added in the component.
To create a new popup, let's first see how AbstractAwaitablePopupOpen https://github.com/odoo/odoo/blob/16.0/addons/point_of_sale/static/src/js/Popups/AbstractAwaitablePopup.js component. This component already have working methods that we can use instead of creating it from scratch. For example, we have confirm method, cancel and getPayload. This is nice since this component will return confirmed if popup has been confirmed and payload that will return any data you want.
Then all of this popups are controlled under PosPopupControllerOpen component where in these triggers show-popup and close-popup has been used under AbstractAwaitablePopup component. These popups will then be stored in this.popups variable which will be called in rendering the component using t-foreach.
To create a new pos popup, we need to import AbstractAwaitablePopup module since this component already extends PosComponent. Using this module, we are able to inherit all existing methods from AbstractAwaitablePopup module, say for example the confirm method and cancel method.
popup_name.js
js
Show or Hide Code
odoo.define('point_of_sale.MessagePopup', function (require){ 'use strict';
Now in order to show this popup, we need to call it using the PoS button we created earlier. Open #new-button-custom-screen
Add Functionalities using RPC Service
Finally, let's add the final task of this tutorial, where in we are going to add the list of all favorite products, if we click toggle favorites, it will show all products. Then if we click each product, the details will show on the right side. We then have the option to either mark it as favorite or not. This simple functionality will give you an idea on how to update something on the backend and get back some result without reloading the page.
We are going to use useState from OWL to manage the state and onWillStart to initialize the data before rendering to the template. RPC service to call the methods from the backend defined under product.product model.
Component
component_name.js
js
Show or Hide Code
odoo.define('point_of_sale.FavoriteProductScreen', function (require){ 'use strict';